Changing the headlight bulbs on a MK2 Ford Focus.
I have seen many forum posts and blog entries that suggest that changing the headlight bulbs on a Ford Focus is a major job, involving much swearing, loss of skin / blood and temper.
Indeed I have read many times the advice "Take it to a dealer to get the bulbs changed", but I don't have that sort of money to throw around. I have also read that the Mark 2 Focus (which mine is) is not quite such a bad job as the original Mk 1 Focus was, so I thought I would try and set down my experience for others to follow / mock etc.
I got so carried away, I did the front foglights too!
Let me start by thanking Benjol for his excellent blog on changing the bulbs on the Mk1 Focus, which gave me the inspiration to try and do the same for the MK2. I hope he doesn't mind if I do this.
What you will need
- A Ford Focus Mark 2 (September 2004 onwards for the UK market, others may vary)
- Replacement Bulb(s)
- A medium sized flat-headed screwdriver (for undoing clips and things)
- A T30 Torx wrench...
- ...or a Large flat-headed screwdriver
- Plenty of light (preferably daylight but you may need a torch/flashlight as well)
- Lots of Patience! (You will need a good hour if doing both sides)
Disclaimer
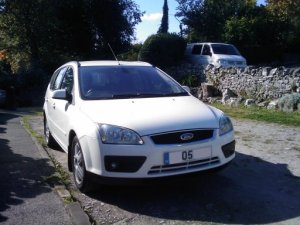
This blog illustrates carrying out the work on a Right Hand Drive UK spec 2005 Ford Focus Diesel Estate. It worked for me, but certain US / European models may vary in some details.
Warnings
(Taken from Ben's blog... but oh so true!)
-
Handling little fiddly things (bulbs, screws, tools) over a complicated engine with lots of deep dark holes is fraught with danger.
Short of turning the car upside down and shaking it, there's not much anyone can do for you if you lose something (and Murphy's law prevents it falling out the bottom). Moral: don't let anything (bulbs, screws) slip out of your hands, don't leave any tools lying on a handy bit of engine. Oh, and don't drop that fiddly little retaining spring either, because not only could it screw your engine up, but you will also probably have to buy a whole new headlight...
-
Don't touch the new bulb with your greasy fingers (but you knew that already). Oh, it's the see-through end you mustn't touch...
The Victi... I mean car!
First step - Open the bonnet/hood
Well duh...
Second step - Gentlemen, choose your headlight!
Please Note, in all the following sections, Right-Hand and Left-Hand are referring to the headlights as seen looking forward from the driver's seat NOT as you look at them from the front of the car. (That'll confuse you!)
On the UK spec car, neither headlight assembly is easier to work on. Both are situated immediately in front of a chassis member which runs across the front of the car and therefore it is impossible to access the back of the headlights whilst they are in situ.
Of course, if you are replacing a blown bulb, then you don't have much choice, but in this instance, as I am replacing all my bulbs with Xenon's I'm going to start with the right-hand unit .
The Right-Hand Headlight Assembly
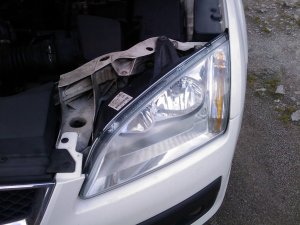
Well, here it is:
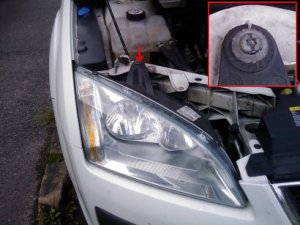
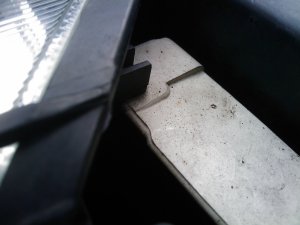
The Headlight unit is held in place by a single T30 Torx screw (inset). If you don't have a set of Torx wrenches, don't despair, as the screw also has a big slot suitable for a large flat-bladed screwdriver. Thankfully, it is much easier to remove the headlight assemblies on the Mark 2 Focus than it was on the Mark 1. This does not intefere with your headlight alignment as that is all done internally by magic (or electricity, or something).
Remove the securing screw, and draw the headlight unit forwards about an inch (or 3cm if you are modern). This is as far as it will go before fouling the front of the grill panel.
To pull it forward, you will need to disengage the clip which is at the back of the headlight unit, at the bottom, on the right as you look at it. (see picture). Reach down behind the chassis member and push it down whilst pulling the headlight towards you and it will come free quite easily. The headlight is also located by plastic lugs which slide over parts of the chassis member behind it. These do not need releasing, but will have to be lined up carefully when you refit the unit.
When the clips are free lift the outer edge of the headlight so that the inner, grill end can be pulled out further, and rotate the whole assembly forward to expose the weathershield at the back. Do this gently, as there is not a lot of slack on the wires.
The weathershield covers all the bulbs in the headlight assembly apart from the indicator. This is found under the cicular cover next to the cable plug. The weathershield is held in place by four clips positioned roughly at each corner. These are quite tight and I used a smaller flat-bladed screwdriver to persuade them to release.
Remove the weathershield and set aside. You can now see the various bulb fittings, and the various wiring plugs.
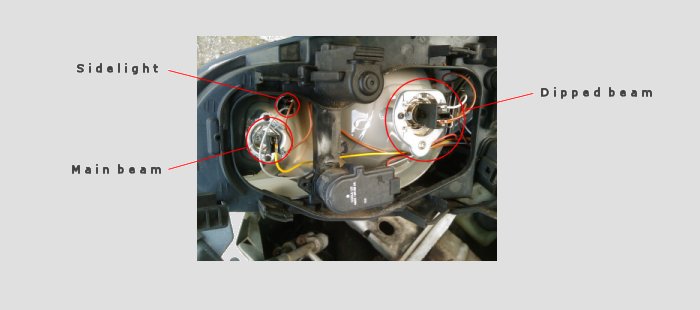
I started with the dipped beam.
Carefully remove the plug on the back of the bulb. The bulb is held in place by a spring clip, hinged at one side. Carefully release the clip and fold back out of the way. The bulb will only fit in the holder one way as there is a tag on the bulb body which fits a slot in the holder, so unlike the Mark 1 Focus, you can't fit the bulb upside down! Remove and replace the bulb, refit the spring clip and then the wiring plug.
The sidelight is next.
The bulb holder is a push fit into the main headlight body. I thought at first it had to be turned to lock or unlock it, but this doesn't appear to be the case, it just pulls out and pushes back in. The bulb is then push fitted into the holder. It is impossible to change the sidelight bulb without touching the glass envelope, as there is nothing else to get hold of. I used a bit of clean kitchen paper to pull out the old bulb and then push in the new one. Be careful, as it is a bit delicate.
Finally, the main beam bulb.
Like the dipped beam, the bulb is held in place by a hinged spring clip. First remove the wiring plug, then undo and fold back the wire clip to release the bulb. Again, the bulb will only fit one way into the body of the headlight, marked by a flat side on the base of the bulb. As before, remove and replace the bulb, refit the spring clip and then the wiring plug.
Now, with all the bulbs replaced on one side, would be an ideal time to check they all work! carefully turn the headlight unit over so it faces forwards and temporarily put it back into place. It doesn't have to be perfect, just position it so you can see the lights. Turn on the car's ignition and then turn on your headlights / sidelights / main beam - whichever you've replaced, and check they are working.
Refitting.
Make sure you have turned off your lights and the ignition! Rotate the headlight unit again so you can refit the weathershield. I found this to be the most difficult bit of the job! The weathershield has a rubber gasket which must be lined up carefully and then compressed in order for the clips to fasten. I found that you need to be quite forceful to get the thing pressed down hard enough to be able to get the clips fully attached. Whilst doing this you need to be careful not to scratch the front glass of the headlight by dragging it over the metal body parts it is resting on.
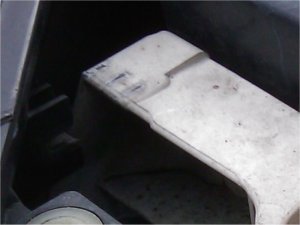 |  |
With the weathershield fitted, rotate the headlight assembly so it is facing forwards, and then move it backwards towards the chassis member. You will have to lift the outside edge of the unit to get the inside edge past the grill panel of the car. Then you need to line up the plastic lugs which slide over the chassis member as you gently move the headlight assembly back into position. There is one of these lugs at the top outside edge of the unit at the back (shown in photos) and one lower down on the inside edge which is hard to see, and then there is the catch at the bottom which we had to release to pull the headlight forward when we removed it. If everything is lined up, the assembly should slide back until the screw hole lines up, and you should hear the bottom catch engage. When you are happy it is back where it should be and secure, replace the fixing screw. Don't overtighten it, as it is only screwing into a plastic fitting, and you could strip the fitting's threads if you get too enthusiastic.
Right, that's the first one done.
The Left-Hand Headlight Assembly
Yup, The next one....
On the UK spec Mark 2 Focus, the left-hand headlight assembly is a mirror image of the right-hand one, and all the fittings are the same. For this reason I don't propose to do a full description of the procedures for the left-hand headlight bulbs, as they are much the same as above. So here are a few photos to keep you happy.
And that's all, folks...
Information on latest Mark 2.5 Focus
Kindly supplied by Phil Perry
I'm now onto my third Ford Focus Mk2.5 (aka Mk2+face lift).
The Mk1 was really bad when it came to changing headlight bulbs, but manageable with a bit of practise.
I never had to replace any of the bulbs in the 1yr old Mk2 which I had for another 3x years!
Just replaced all the headlight bulbs in the Mk2.5 and thought I'd update your process by advising others, that in a Mk2.5 the easiest way of replacing the bulbs is still to completely remove the headlamp assembly, but on the Mk2.5 all the bulbs have rubber inspection caps built onto the back of the assembly - so it's just a simple case of picking the bulb you want to replace, pulling off the rubber inspection cap and replacing the bulb. For the main and dipped bulbs (H1+H7's) there's no longer any metal clips, it's an incorporated electrical plug and catch on a runner/support - really easy.
For the side bulb (w5w), it's still behind a rubber inspection cup but on the end of a long plastic stick(?) you just need to pull with a slight twisting to either side to get it loose.
On the whole, after seeing inside the inspection caps, in a motorway/roadside situation at night, in the dark, I'd be tempted to replace the dipper or main bulbs without removing the headlight assembly in an emergency.
By the way, to pickup on a previous comment, my owners manual shows the wrong bulb replacement pictures and doesn't show or detail the bulb inspection covers at all - but give Ford their due - they've made it simple compared back to the Mk1!